


Rebedding Softeners and Filters
In general, putting new media into a water softener or tank-style filter is like screwing the lid off of a bottle, dumping out the contents, then refilling the bottle. What complicates the procedure is largely that it is a very big bottle and it is often located in an inconvenient place. It doesn’t have to be a hard job, but it can be a messy job. Here are suggested steps:
- Start by disconnecting from your house plumbing. If you have a bypass valve on the filter or softener, put it in bypass. If not, turn off the water source. Disconnect the control valve from house plumbing. With Fleck controls, simply remove the two clips that hold the bypass (or yoke) to the control valve. The drain line will also have to be disconnected from the control valve.
- Move the filter/softener away from the plumbing connection so that you have room to work, then screw the control valve off the tank (like screwing the lid off of a bottle). It screws out counter-clockwise. You should not need a wrench, but this is often a two-person job, with one person holding the tank in place while the other unscrews the control valve.
- Next, you’re going to get the filter media out of the tank. This may be easy or very difficult, depending on where the filter is located, how large it is, and the condition of the media bed. If the filter is small enough and relatively clean, you can simply move it to a convenient location–near a drain, or outdoors–turn it over and dump out the contents. However, if it’s a heavy tank or the media is laden with iron or dirt, you’ll have to improvise. Sometimes with very dirty iron filters it’s more practical to replace the tank than empty it. Some tricks that can make this job easier include siphoning out some water to lighten the tank so it can be moved outdoors or to a floor drain or using a shop vac to suck out the water and the media. Except in exceptional cases, like arsenic filters, the old media in the tank is not regarded as a hazardous material, so you can dump it on the lawn or dispose of it as you see fit. If you have a conventional filter tank, the center tube (dip tube or riser) can be removed to make it easier to dump out the media; with a Vortech tank, the riser is attached to the bottom of the tank, so it stays in place and you’ll have to work around it. If you’re outdoors and can get the tank propped mouth-down at a 45 degree angle, you can insert a running garden hose into the tank and in most case wash the media out easily.
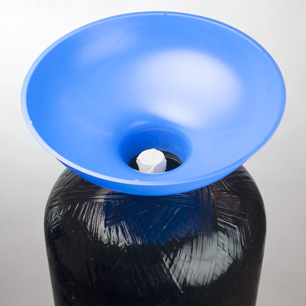
Using a media funnel. Note that the dip tube is covered to keep media from getting inside the tube (and subsequently into the home’s service lines).
- When the tank is empty, rebed by pouring in media using the same procedure you would use for filling a new filter. Before you pour in gravel or media, be sure you cover the top of the riser tube with tape or a small plastic bag to keep media from entering the riser tube. If it’s a standard tank, be sure the riser is in place in the bottom of the tank, pour in gravel, if needed, then pour in the filter media. With standard tanks, you’ll need gravel underbedding for filter media; with residential-sized softeners, gravel is usually optional. With Vortech tanks, except in rare cases, no gravel is needed for filters or softeners. Since dry filter media often puts off dust, it is recommended that you wear a face mask while filling the tank to avoid breathing in dust. Filling the tank is most easily done by two people. Using a media funnel greatly facilitates the task. Without a funnel, you may have to scoop it in.
- When the tank is full (“full,” in most cases, means about 1/2 to 2/3 deep in the tank), replace the control valve. It is important to lubricate the o ring that makes the seal between the top of the tank and control valves with silicone. Also, lube the o rings inside the bottom hole of the control valve so that the riser can slide in easily and make a good seal. Be sure to clean media dust out of the threads on the tank before screwing on the valve to prevent damaging the threads. Screw the head on snugly. No tool is needed.
- When the control valve is back on the tank, reinstall to your plumbing, then follow the startup procedure you would use for a new filter or softener.
- Check for leaks.

