Pure Water Products Simple Emergency Filter


Here’s how it works:

hydronixsiphon02

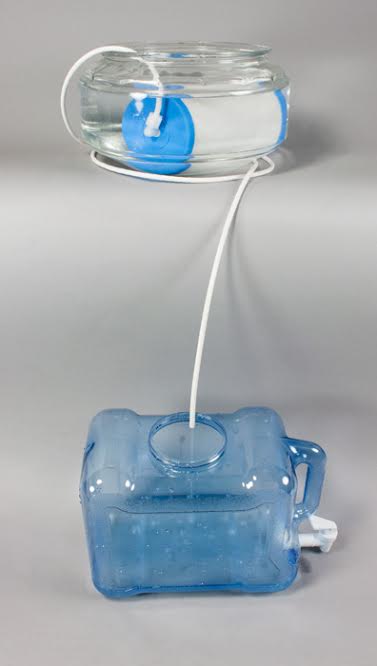
Water to be treated is placed in the top container. The force of gravity (siphon) pulls the water through the filter into the bottom container.

Directions for use

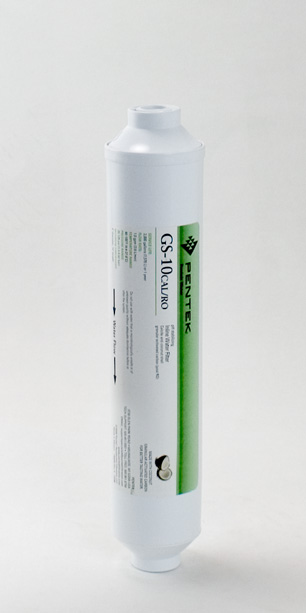
The filter is a high quality coconut shell carbon block that is capable of removing chlorine and a broad range of chemical contaminants from water. It does not remove bacteria without the help of chlorination. It can be used to make excellent drinking water from any reasonably clean water if chlorine in the form of standard household bleach is added to the water.

Suggested uses are during times of emergency when standard water supply is cut off or during “boil water” alerts. Or, it can be used to make excellent drinking water from regular tap water on a regular basis.

The source of water during emergencies can be swimming pools, wells, emergency water stored in containers, rivers, lakes, ponds–any fresh water source. The filter will not work with sea water or brackish water.

Prefiltering

If the water contains visible debris, prefilter the water through a clean cloth or a coffee filter before putting it into the top treatment container.

Disinfecting

Unless the water is known to be bacteria free or is already chlorinated (water taken from a swimming pool, for example), disinfect as described below using standard, unscented laundry bleach. The following directions are from Clorox:

Using an eyedropper or a measuring cup, add bleach to the water in the following proportions:

  • Two drops of regular bleach per quart of water.
  • 8 drops of bleach per gallon of water.
  • 1/2 teaspoon of bleach per five gallons of water.

If the water is cloudy, double the dosage.  Use regular bleach, not scented.

To treat, add bleach to water, stir well, and wait 30 minutes. Water should have a slight bleach odor.  If it doesn’t, add a bit more bleach, wait fifteen minutes, and sniff again.

hydronixsiphon03

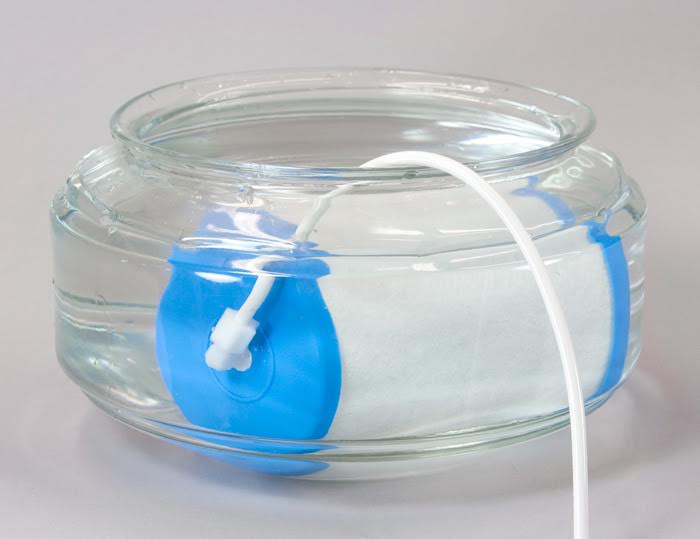
The upper container must be large enough to allow the filter to lie on its side.  A five gallon bucket will work fine. 

 Operation

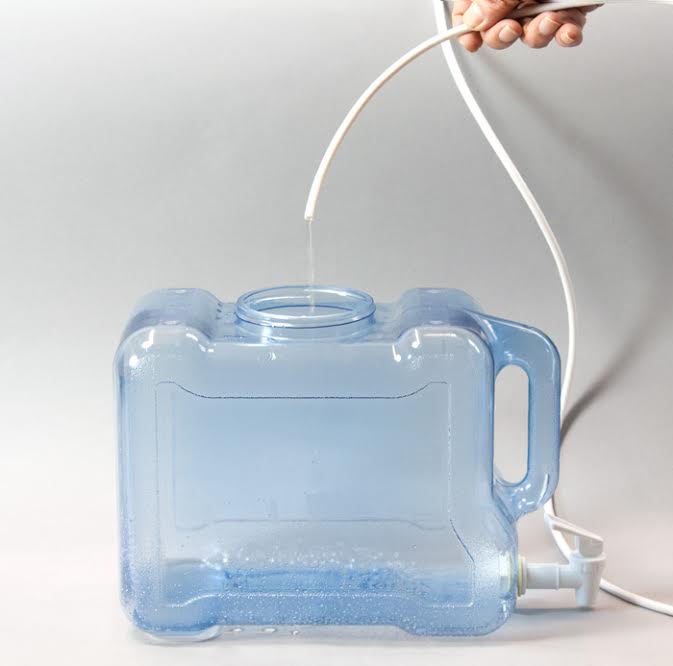
What you need for a complete emergency water treatment kit:  The filter itself, which consists of a carbon block filter and a 6′ siphon adapter. A bottle of bleach, an eyedropper, a measuring spoon, a few clean rags for filtering dirty water and/or a few coffee filters. A bottle or bucket to hold the filter (top bottle in the picture): must be large enough to allow the filter to lie on its side. A second bucket or bottle to catch the filtered water.

Arrange the filter so that the container with the filter is at least a foot above the receiving container.  The higher the elevation of the first filter, the faster the unit will produce.

Place the water to be treated in the upper container.  Drop in the filter, with the adapter attached. For first use, the fitler will float. Give it a few minutes to sink.  When the filter is resting on the bottom of the container, start the siphon by sucking through the tube until you get water in your mouth.  It’s just like sucking on a soda straw. When you taste water, immediately lower the tube and the siphon effect will take over and water will continue to be drawn through the filter. The first water out will taste bad because the filter has not been rinsed.   Allow the unit to run initially for at least two hours before collecting the water for drinking. This applies only to the first time the filter is used. It will not need extensive rinsing after the first use.

The siphon filter will remove chemicals, including the chlorine used to disinfect the water, and make potable, excellent tasting water. Production depends on elevation and water temperature, but you can expect at least 50 gallons per day with even modest elevation.

hydronixsiphon04

Production rate varies, but the greater the elevation, the faster the production. Keeping the water to be treated as free of visible debris as possible will prolong the life of the filter and keep production rates high.

hydronixsiphon01

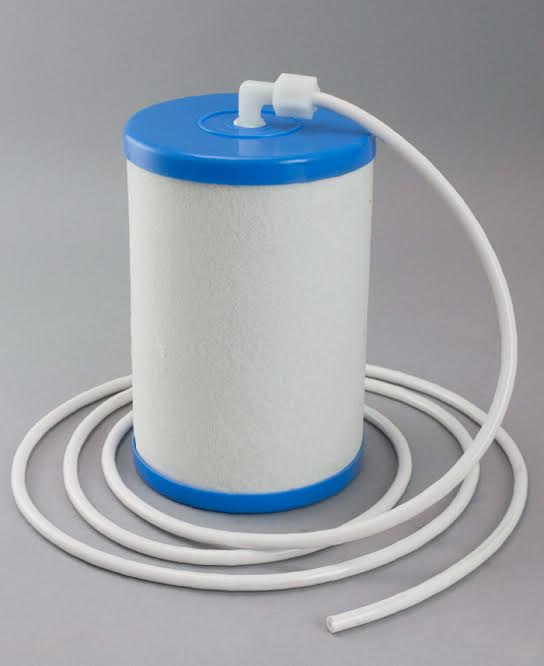
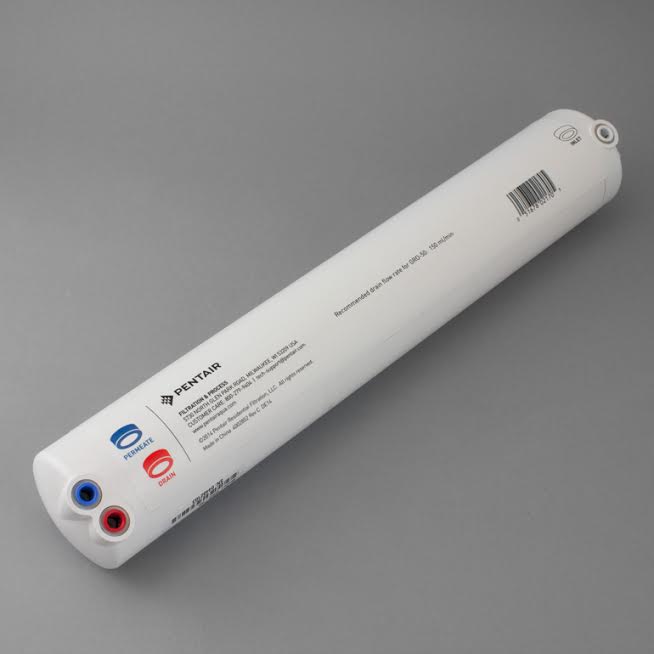
The filter kit itself consists of a high quality coconut shell carbon block filter. The manufacturer suggests a 750 gallon life before replacement, but it will remove chlorine from water for a much longer time. The only assembly required is screwing the adapter hose into the hole in the top of the filter cartridge. The filter will work in a verical or horizontal position, but we recommend laying it on its side.  On its side, it will empty the container completely.

Call Pure Water Products, 940 382 3814, for performance or product purchase information.

National Garden Hose Day Is Just Around the Corner

The garden hose is a national treasure. I hope you’ll attend a Garden Hose Day celebration in your area.Bob Logan, National Garden Hose Day Director.

gardenhosetug02

National Garden Hose Day celebrations around the country this year will include some new activities. Above is a Cleveland practice session for the new canine division of the Garden Hose Pull, the holiday’s most popular event.  Dogs are enthusiastic contenders, but cats have shown no interest in the event.

National Garden Hose Day officials have high hopes that the new date for National Garden Hose Day –moved from August 3 to June 21–will bring new energy to the celebration. Moving the event from summer’s “Dog Days” to its exhuberant beginning is expected to bring people out. Last year’s event was essentially a disappointment.  Officials blamed a combination of drought conditions along with reluctance to support events that were seen as high water consumers for the downturn in attendance. Some of the popular events, like the traditional Hose Blast, received negative publicity because of high water consumption. The event has been discontinued.

firehoseanimation


The Fire Hose Blast, although very popular, was phased out after 2013 and has now been officially cancelled because of complaints of high water consumption and injuries to contestants.

Bob Logan of Minneapolis, National Garden Hose Day director for the current year, said that new activities have been added that are expected to appeal to a wider audience.  According to Logan, “Although the hose blast drew large crowds, there were complaints of water waste and injuries. Although the Blast is gone, this year’s event will center around the ever-popular Garden Hose Pull and some exciting new events.”

The most popular of the new items according to pre-holiday reports is a garden hose recycling competition that has been underway for some weeks in several cities.  This event offers prizes for innovative uses for old garden hoses. The purpose of the event is to find uses for garden hoses that at one time would have ended in landfills.

gardenhosebasket

This colorful garden hose basket was made from a Baltimore family’s discarded hose. The hose was replaced because the color clashed with the trim on the patio. This garden hose basket could easily be worked into a self-watering planter.

gardenhoseruglargeThis attractive rug was created by a Phoenix family from a hose that had been in the family vegetable garden for almost a decade. 

Mr. Logan concluded: The garden hose is a national treasure, and Garden Hose Day is set aside to honor it. Look for events in your area.


waterfallstugelafalls

Tugela Falls in South Africa: The Tallest Waterfall in the World?

The “tallest waterfall” title is disputed by fans of Tugela Falls in South Africa.  The “taller than thou” dispute centers around accuracy of measurement. As you may imagine, waterfall measuring is not an exact science. Most believe that Angel Falls is probably shorter than its official 1949 measurement shows and that Tugela Falls is likely taller than its official measurements indicate. Officially, Tugela is 3,110 feet tall, but some argue that its true height falls between 3,255 and 3,320 feet.

Not only is Angel Falls likely shorter than initially measured in 1949, but Tugela Falls is likely taller than its measurements indicate. So rather than 3,110 feet as usually stated (which makes it a bit shorter than the possibly erroneously stated 3,212 feet of Angel Falls) Tugela Falls may more likely be somewhere between 3,255 feet and 3,320 feet in height.

If the two waterfalls are remeasured with more accuracy, we just may see the title for world’s tallest waterfall change hands. In the meantime, life goes on.

The no-showering challenge: why we should all take part

by Madeleine Somerville

Cleansing ourselves too often means wasting increasingly valuable drinking water – and it can actually backfire when it comes to good hygiene

shower01

In doing so, he discovered what thousands of others have: the more we fervently try to clean ourselves with soaps, body washes, and those silly little body poufs, the harder our skin works to restore equilibrium, cueing us to begin the whole bewildering process again. Showering strips the skin of its own oil and bacteria – which, many would argue, is the whole point of showering – but apparently this sometimes works a little too well, especially when you add hot water and cleansing products to the mix.


Adding Pentair’s New GRO Encapsulated Membrane to Your RO Unit

gro01

The GRO membrane has color-coded ports that make installation easy. (Click picture for a larger view.)

The new membrane is “encapsulated.”  This means that it doesn’t have a permanent housing that contains a removable membrane element. It is a membrane and a housing in one piece.  To add this membrane to an existing RO unit, you’ll be throwing away your current membrane housing and replacing it with the GRO. Any elbow fittings that attach tubes to your current membrane will also be discarded.

Your current membrane housing has three tubing ports–two on one end, one on the other.  The single port is where water enters the membrane housing after it leaves your prefilter. Inside the membrane housing the water is split into two streams and these leave by their separate ports on the other end of the housing. One is called permeate. This is the water you’re going to drink. The second is called brine. This is the reject water that’s going to the undersink drain pipe.  In most cases the permeate port will be the one nearest the center of the membrane housing and the brine port will be the one that’s offset to the side a bit. The brine port may be to the left or to the right of the permeate port.

To replace your current membrane with the new GRO,  begin by identifying (with a tag if necessary) the three tubes going into your current membrane housing:  Tap water inlet (on the end that has only one tube), premeate (the product water leaving the membrane through the center-most fitting), and brine (the offset tube that goes to the drain.

To install the new membrane, just connect the tubes from your RO unit to the appropriate ports on the new membrane.  The Tap Water Inlet tube goes into the white port on the GRO; the Permeate tube goes into the blue port; the Brine tube goes into the red port. You’ll have to insert an inline check valve into the Permeate tube.  Be sure it points toward the auto shutoff valve. You’ll also have to insert the appropriate flow restrictor into the Brine tube.  Be sure it points away from the membrane toward the undersink drain connection.

checkvalve

Check valve goes between the blue port of the membrane and the auto shutoff valve.

flowrestrictor150

The flow restrictor is inserted into the drain line.  Note directional flow arrow. The 150 ml flow restrictor shown above is for the GRO 50 gpd membrane.

If you’re lucky, the tubes from your old membrane will be long enough to plug into your new membrane. If tubes are too short, replace them. A crimped tube will eventually leak. Things you might need for the job are extra tubing and some plug in elbows.

pluginelbow14

A plug-in elbow makes tube connection easy with the GRO membrane. Plug the stem into the membrane port and plug the tube into the quick connect port of the fitting.  The result is a swivelling elbow that’s ideal for your installation.

The membrane manufacturer recommends a 24-hour rinse before using the water. Most users don’t rinse this long. Keep in mind that RO membranes are packed in preseratives, so you’ll want to rinse the unit thoroughly before using the water. We suggest allowing the RO unit to run with the faucet open for at least an hour before closing the faucet and capturing water in the storage tank. Then, when the tank is full, open the faucet, dump the water from the tank, then allow the tank to refill before you use the water.

Please call if there are questions:  Pure Water Products, 940-382-3814.

Black & White RO Units


Posted June 1st, 2016

Simple Reverse Osmosis Units with Lots of Options

After many years of selling our famous (to us, at least) Black and White reverse osmosis units, we’ve decided to change the way we present them. The core product will be the same tough, simple unit, but our website presentation will soon allow customers to build their own RO unit by choosing from among three basic designs then adding features. The simple three-stage unit, the core product, which has been by far the most popular style over the years, will actually go down in price, but some of the add-on options that we’ve been giving phone customers will be added for selection on the website at a modest increase in price.

We’re now going to build the basic units in 3 formats only.  You can see them in the pictures below.

By far the most popular style is the simple three-stage unit consisting of a carbon block prefilter, the RO membrane, and a carbon block postfilter.

bwrobymarcus350

Three Stage Black and White RO Unit

This most basic undersink RO unit, the “three stage,” has a prefilter (vertical canister on the left in the picture), an RO membrane (the horizontal canister), and a postfilter (right vertical canister).  “Pre” means that the filter comes before the membrane, and “post” means that it comes after. The prefilter is normally a carbon block filter, since it has to protect the membrane from chlorine or chloramine in city water. (On unchlorinated well water, a simple sediment filter may be used.)

The basic three stage unit shown above has all the essentials that make undersink RO units such excellent performers: two top quality carbon filters to remove disinfectants and chemical contaminants and an RO membrane to deal with the hard-to-remove contaminants that carbon doesn’t handle, like lead, arsenic, nitrates, and fluoride. The  membrane also reduces the dissolved solids (called TDS, for total dissolved solids) by about 95%. (All Black and White units come with a hand-held TDS tester so that membrane performance can be verified.)

Most standard “4-stage” RO units on the market use two full-sized filters plus a small refrigerator filter clipped to the membrane as the final carbon stage.  Black and White  4-stage units, by contrast, use three full-sized filters plus the membrane.  In all Black and White units, prefilters are housed in black vessels and postfilters are in white housings.  The unit pictured below has two prefilters (black) and a single postfilter (white).

BWRO4B

Black and White 4-Stage with Two Pre-Filters

Having two prefilters allows a variety of cartridge choices. Here are some prefilter cartridges that might be added as the first or second prefilter  element:

  • A sediment filter.
  • An additional carbon block filter.
  • A scale prevention cartridges to protect the membrane from scaling.
  • A KDF55 stage to enhance chlorine removal and inhibit growth of bacteria within the unit.
  • An iron filter to protect the membrane from iron or manganese.
  • An oxidizing prefilter to enhance arsenic reduction.
  • A KDF85 stage for pretreatment of smelly well water.

BWRO4A

Black and White 4 Stage with Two Post-Filters

With two postfilters, here are some popular choices for the extra postfilter stage:

  • An extra carbon block filter.
  • A ceramic or other extremely tight filter to assure bacteria-free water.
  • A pH/alkalinity increaser.
  • A cation (softener resin) cartridge to remove ammonia.
  • A deionizing (DI) cartridge to remove ammonia and reduce all dissolved solids to zero.

All Black and White units built in the three basic styles above come with cartridges of your choice.  The price of the unit is the same regardless of the cartridges selected.

Add-ons and Upgrades

calciteinline

This Calcite/Coconut shell inline filter that gives a mild increase to pH and TDS is a popular postfilter add-on.

Black and White units are now built only in the three basic formats shown.  Any additional components are viewed as add-ons, not additional “stages” to the RO unit. Popular add-ons are inline sediment or carbon filters, ceramic filters, calcite filters, and scale reducers. Add-ons of this type usually come with their own mounting bracket for placement near the main unit.

The standard faucet for Black and White units is the top quality conventional chrome Tomplinson ProFlo. It comes as standard equipment with the RO unit.  There is an extra charge for upgrading to Tomlinson Designer and Contemporary faucets that are offered in a variety of finishes as options. Other Tomlinson models are available by special order.

Performance upgrades are offered at a modest upcharge. These are all features that  require a special rebuild of the basic units.  They include:

  • Adding a performance boosting permeate pump to the unit.
  • Substituting a water saving Pentek encapsulated membrane for the standard Filmtec membrane.
  • Furnishing the unit with 3/8″ tubing from the storage tank to the faucet to enhance flow to faucet and refrigerators.
  • Including a kit to connect the RO unit to a refrigerator or other remote point of use.

Added equipment, of course, can be included for the price of the equipment itself:

  • Adding an extra storage tank or a larger capacity storage tank.
  • Adding a “demand pump” setup to deliver RO water to a remote location.
  • Adding a “booster pump” to increase pressure coming into the RO unit.
  • Adding a a small ultraviolet unit either before or after the RO unit.

Watch for these changes on our Black and White reverse osmosis page, coming soon.