Converting your Black and White Countertop RO Unit (Style A) to a Standard 3-stage Black and White Reverse Osmosis Unit
The Finished Product
These instructions apply only to Pure Water Products’ standard style A Countertop Reverse Osmosis Unit. The parts and instructions do not apply to other products.
In addition to the Black and White Style A RO Unit, here’s what you’ll need:
Our Conversion Kit. Part Number RP105. The Kit costs around $198 and includes everything you will need. Parts can be ordered from our main website using the part numbers of the individual parts.
1 ta005 Storage Tank.
1 jg011 1/4″ tee.
1 jg014 Tank Valve.
1 rc300 Auto Shutoff Valve.
1 rc200 ASO-Membrane Clip
2 rc001 JG Check Valves
1 rc100 Drain Saddle Kit
1 iv100 or iv103 Inlet Kit
1 lf700 Pro-Flo Faucet
5 tb001 Five feet of 1/4″ tubing.
Here’s how you do it
Converting your Black and White Countertop RO to Undersink
1. Install the faucet and inlet kits. When conversion is complete and you install the unit, you will plug the inlet tube into the black (left) housing and the faucet tube into the right (white).
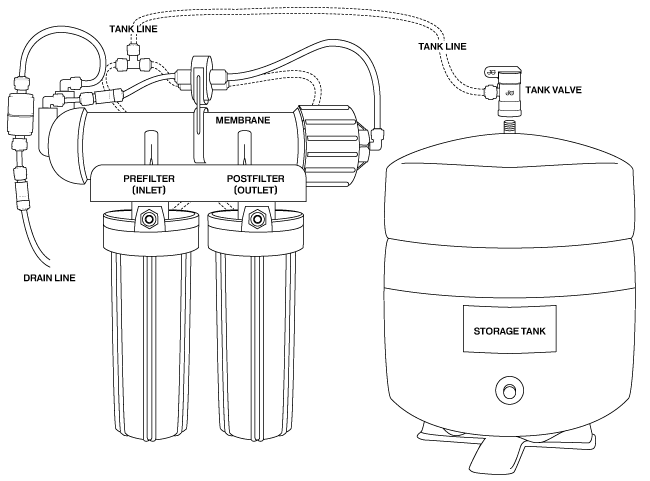
2. Mount the shutoff valve in its clip on top of the RO membrane with the IN/OUT side of the valve facing the capped end of the membrane housing (the end that has only one tube).
3. Remove the tube from the fitting on the membrane cap and install it into the IN port of the shutoff valve. Run a new tube from the OUT port to the recently vacated fitting in the membrane housing cap.
4. On the other end of the membrane, remove the tube from the Permeate fitting (the one that isn’t the drain) and replace it with a short tube that connects it to the nearest TANK port of the shutoff valve. Insert a check valve into the new tube between the membrane and the shutoff valve with the arrow pointing toward the shutoff valve.
5. Loop the tube you removed from the Permeate port of the membrane back and insert it into the remaining empty port of the shutoff valve. (The other end remains connected to the back port of the white postfilter housing.) At any convenient place in this tube, insert the tee to connect the tank to the unit.
6. Install the shutoff valve onto the top of the storage tank, then use a single tube to connect the tank valve to the tee that you installed in step 5.
7. Install the drain saddle following instructions in the kit and connect the existing RO drain tube to the fitting in the drain saddle. Install the remaining check valve between the drain line flow restrictor and the drain saddle with the arrow pointing toward the drain saddle.
Refer to the picture at the top of this article as a model, and don’t hesitate to call or email us if you hit a snag.
Pure Water Products
888 382 3814
pwp@purewaterproducts.com


