


Changing Seals, Spacers, and Piston in Fleck 5600 (and imitation) Controls
Easy Repair for Fleck 5600 Controls: Pistons, Seals, and Spacers

Replacing seals and spacers in the Fleck 5600 control valve for water softeners and filters is a fairly easy “do it yourself” job that can save you the expense of professional service and the inconvenience of waiting for repair to be done.
Seals, spacers, and pistons are the control valve parts that eventually need replacement. They may wear out in a few months or last for many years, their longevity depending mainly on the use the filter or softener gets. Logically, the most fragile valve parts will need more frequent replacement on a well-water iron filter than on a chlorine removal filter running on clean city water,
Whatever the usage, the common symptoms of piston and seal/spacer problems are the control valve’s inability to complete the regeneration cycle because it hangs up in backwash or rinse position. If the filter runs water to drain when it should be in service position and running water only to the home, the problem is almost always seals and spacers. This is a serious problem that not only wastes water and energy, but for well users excess water drain to leach fields and septic systems and lead to very expensive repairs.
Although seals, spacers and piston are inner parts of the control valve, they’re easy to get to and the repair can in most cases be done without removing the control unit from the filter or softener.
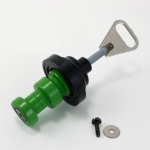
Parts needed for 5600 Seal, Spacer, Piston replacement for a 5600 filter or softener control are
FL537 — 5600 Filter Piston, Standard Timer Unit.
FL516 — 5600 Softener Piston, Standard Timer and Electromechanical Meter (Econominder) Unit.
FL539 — 5600 Piston all SXT Units, Softeners and Filters, Including AIO Filters.
FL517 – 5600 Seal and Spacer Kit, all 5600 units.
Mike’s Easy Ten-Step Method for Replacing Piston, Seals and Spacers in 5600 Filters and Softeners
For a parts list and illustration, see pp. 16.-17 of the 5600 Service Manual.
1. Turn off the incoming water and relieve pressure by putting the unit in bypass or by opening a faucet downstream. If the unit has a bypass valve, you can simply put it in bypass. If there is a meter, pull out the cable to disconnect it.
2. Remove the back cover of the control valve.
3. Remove the screw and washer from the drive yoke, then remove the timer mounting screws and the entire timer assembly will lift off easily. Remove the end plug retainer plate.
4. Pull upward on piston yoke to remove the piston from the valve.
5. If you are replacing only the seals and spacers, or the seals and spacers as well as the piston, remove the seals and spacers at this time. Usually you can pull them out with your fingers, but in dirty filters some brute force may be needed. A screwdriver is a good tool. To replace the seals and spacers, the order is seal, spacer, seal, spacer, etc. Both the top and bottom items will be seals.
6. When the seals and spacers are either inspected or replaced, push the piston into the valve by means of the end plug. Twist the yoke carefully in a CLOCKWISE direction to align it properly with the drive gear.
7. Replace the end plug retainer plate.
8. Replace the timer on top of the valve, making sure that the drive pin engages the slot in the drive yoke. Rotate the control knob if necessary.
9. Replace the timer mounting screws and the screw and washer in the drive yoke.
10. Return the valve to service and check for leaks.
A note about You Tube videos. There are several good “how to” videos available most of the time that can be found with a simple search. Keep in mind that not all will be about the valve that you have. For example, if you have a 5600 filter, ignore instructions about meters, brine valves, and injectors. Seal and spacer replacement is the same on all 5600 controls.

